Saturday 23 February 2013

PAC [Paranoid + Aokp+ Cm10] ROM JB 4.2


 PAC [Paranoid + Aokp+ Cm10] ROM JB 4.2


PAC-Paranoid-+-Aokp+-Cm101
Well, I am not sure if you are familiar with the Paranoid ROMs for Android phones or not. If not, let me inform you this ROM is one of its kind. Personally, I am a fan of this one and currently enjoying it on my Galaxy S3. The ROM comes mostly for high-end devices. Thanks to Nims11 for porting it to the Galaxy Ace S55830. In fact the Paranoid ROM is a Hybrid ROM that beautifully blend the look of a phone and a tablet layout into one whole. Just imagine getting a tablet style look at your Ace. With the Paranoid Android ROM installed on your phone you can change and switch your phone’s screen layout in three modes: phone, tablet and a blend of both, pablet (phone+tablet). It a batteryfriendly ROM with a fast user interface and good battery life. Another reason to go for this ROM is that it is based on the latest version of Android OS 4.2.1 Jelly Bean.
Download ROM: Link
Download Google Apps: Gapps-jb-20121011-signed.zip [CyanogenMod 10.0.x]
How to Install: See at the beginning of the post for installation procedure.

Unofficial CM 10 ‘Jellaxy’ ROM JB 4.1.1


 Unofficial CM 10 ‘Jellaxy’ ROM JB 4.1.1


Unofficial-CyanogenMod-10-Jellaxy
The Jellaxy ROM is a CyanogenMod 10 based custom ROM that lets you enjoy Android 4.1.1 Jelly Bean on your very Galaxy Ace S5830. Having installed this cool ROM on your phone your will be all good features like the Google Now, Project Butter, new Notifications system, lockscreen associated with Jelly Bean. Except for a few features like USB tethering, Wi-Fi tethering and Google Now (voice search) the ROM developer has been significantly successful in porting all other features in a working state.
Download ROM: Link (updated- January 04)
Download Google Apps: Gapps-jb-20121011-signed.zip [CyanogenMod 10.0.x]
How to Install: See at the beginning of the post for installation procedure. Here are are the steps to perform in CWM Recovery:
  1. Boot into CWM
  2. Wipe Data/Factory Reset
  3. Go to ‘mounts and storage’ and ‘format /system’ (Double check that you have selected /system and NOT /sdcard)

Install a Custom ROM on Galaxy Ace s5830:


How to Install a Custom ROM on Galaxy Ace s5830:

Getting Ready:
Well, if you ready to flash a Jelly Bean ROM on your Galaxy Ace, you need to do a few things before proceeding to flash the ROM. Since a custom ROM is directly related to modifying/replacing the system files, it requires root access and there fore you will have to root your phone before being eligible to any such action. If you have yet rooted your Galaxy Ace, head over to our handy tutorial first, then continue from the steps below: Root Samsung Galaxy Ace S5830
Among the other things you need to do before installing this ROM are:
  • Get your Galaxy Ace fully charged.
  • Backup all your contacts, messages and other important data.
  • Turn on the USB Debugging mode on your device. Go to Settings> Applications>Development> USB Debugging> check the box.
  • Download the ROM  you like from the links below. Do not extract the zip file and copy it  to the main directory of your device’s SD Card (not in a sub-folder).
  • Download Google Apps for your phone from below (do not extract) and copy it to the same location as the ROM file.
Installing a ROM on Galaxy Ace:
  1. First of all make sure that you have done all things mentioned above under preparations.
  2. Turn off your device and boot it into CWM Recovery Mode. Press and hold  the Home+Power  keys till the start up screen with “Samsung Galaxy Ace GT-S5830″ logo blinks for two times and you see a screen as shown below.  Another way to boot the device into ClockworkMod  to download the ROM Manager app from the Google Play Store and use “Reboot into Recovery” option.
  3. In the Recovery Mode, use Volume, Home and Power keys to navigate between the options and select them. galaxy-ace-recovery
  4. Open “backup and restore” and backup your current ROM (important). When the backup is done go back to the main menu
  5. In the CWM Recovery Mode, scroll to “wipe data factory reset” option and select “Yes”.
  6. Then come back to the main menu and select “install zip from sdcard> choose zip from sdcard”. Now browse to the ROM file and select it. Confirm your choice by selecting “yes”.
  7. This will start the installation process and will take a few minutes to complete.
  8. When it is done, go back and install the GApps using Step 8.
  9. Return to the main menu again and select “reboot system now”. It might take a few minutes before your device reboots, so a little patience is required.
When the phone boots up, you will be able to enjoy the newly installed Jelly Bean ROM on your phone. Cheers!

Friday 22 February 2013

How to Un-root the Ace

How to Un-root the Ace

1. Download unroot.zip  and put in sd card

2. Turn off the phone and boot into recovery (refer to step 3 above)

3. Install the unroot.zip (similar to step 5 and 6 above)

4. Restart phone (incase you’re THAT stupid, refer to step 7 above)

5. Look in the app drawer and if all went well, the superuser icon should no longer be there!!!

How to Root the Galaxy Ace

How to Root the Galaxy Ace

1. Copy the Root.zip file into your sd card. You can even put it in a folder if you want.

2. Turn your phone off

3. Boot your phone into recovery mode. To do that, hold HOME+POWER buttons. When the screen turns on and you see the Samsung logo, let go of POWER but keep holding HOME. After the Galaxy Ace logo shows up and disappears, you should enter recovery mode. You can let go of HOME now.

4. Now in recovery mode, you can scroll up and down using the VOLUME UP and VOLUME DOWN buttons and select using the HOME button.

5. Scroll to the second option “apply update from sdcard” and press HOME to select.

6. Scroll to the Root.zip file and select it (if you put it in a folder, find and open that folder and then select Root.zip

7. After it’s done installing, select “reboot system now” and wait for the phone to reboot

8. To check if your phone is rooted, go to you app drawer and look for an app called superuser with an icon of a pirate android with cross bones. If you see it, your phone is rooted.


Congrats! You’ve officially rooted you galaxy ace!!


Thursday 21 February 2013

MindCr SGS3 Styled Rom for Galaxy Ace S5830i


 MindCr SGS3 Styled Rom for Galaxy Ace S5830i


MindCr-Rom-Galaxy-S3-S5830i

Review:

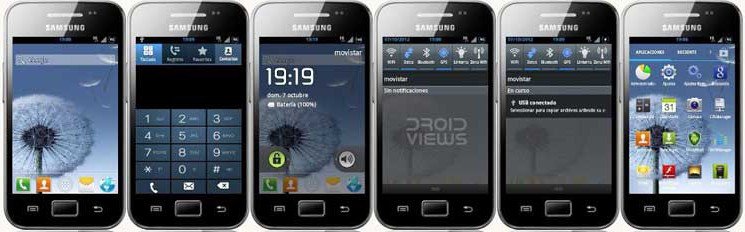
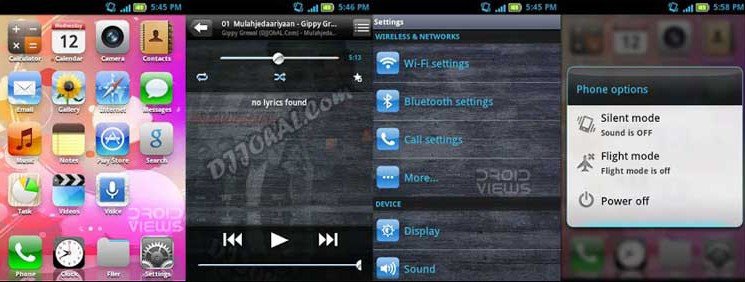
Enjoy the look and feel of the Samsung Galaxy S3 on your very Galaxy Ace S58230i by dressing up your phone with the MindCr SGS3 styled Rom. It is a feature packed ROM that ports most of the Galaxy S3 UI design. The ROM is fast, smooth  and battery-friendly as well. The ROM is based on Android 2.3.6 Gingerbread. To know what features it brings toyour phone, just throw your eyes below.

Features of the ROM:

  • Rom 2.4 Deodexed MindCr Gingerbread.BGHL4 (XXLH3)
  • Bootanimation – Blue Android Particles.
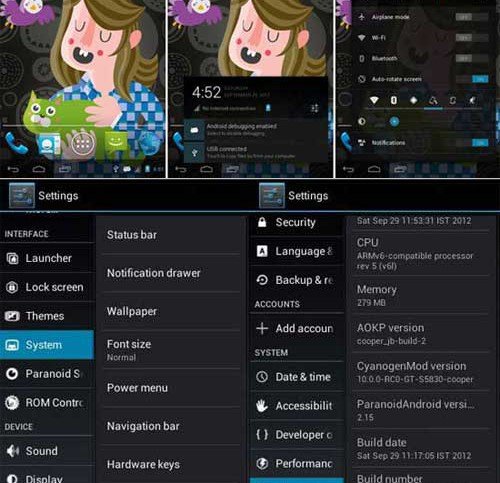
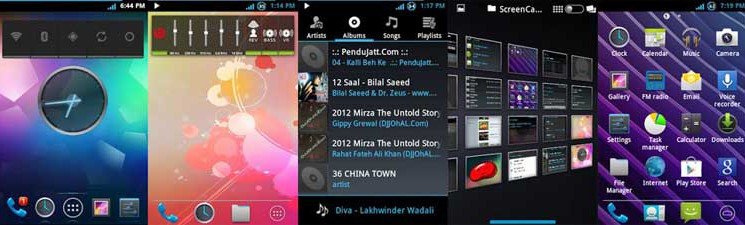
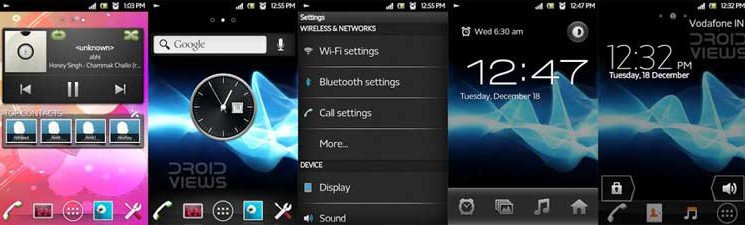
  • SGS3 themed: Looks like SGS3, Sounds SGS3, Dialer SGS3, Wallpapers & Ringtones SGS3
  • 15 buttons in the scroll-bar (6 visible).
  • 6 screen lock styles.
  • Swipe notifications to remove it
  • Center Clock
  • Fix Host file for AdFree
  • Removed some useless applications.
  • Holo Launcher 1.2.8
  • Tweaks and battery performance.
  • Memory and Internet Tweaks
  • Mod Touchscreen sensibility
  • Automatic Zipaling every 5 starts.
  • Improved sound (Mega Bass Beats + Dsp Manager)
  • SD cache size 1024
  • ZRam 72 mb
  • Kernel Rafael Baugis 201211201515
  • Quickpanel and ROM settings support language: English, Spanish, Italian and Polish

How to Install:

If you are going to install this ROM over a another custom ROM, follow the guide given the beginning. In case, you are to flash it over a stock ROM, follow the following steps:
  1. Download the ROM: Link 1,  Link 2
  2. Download ClockworkMod: Link 1,  Link 2
  3. Download Flash Player: Link 1,  Link 2
  4. Copy the ROM file.zip, ClockWorkRec.zip and Flash Player.zip files in the root (main) directory of your SD Card.
  5. Turn off the phone and boot it into Recovery Mode by pressing: Volume up + home + power. (To navigate the menu use the volume keys, to select the home, and back to return).
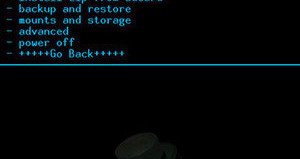
  6. Go to “apply update from sdcard” and choose ClockworkRec.zip
  7. Then wipe data / reset – YES
  8. Go to “advanced>Wipe Dalvik Cache>yes
  9. Return to main menu
  10. Go to “mounts and storage> format /system> yes”
  11. mount /system (it change to unmount) – Press Back
  12. Select “install zip from sd” / “choose zip from sd card”
  13. Select ROM file and confirm
  14. When the installation is finished, go  back to main menu and reboot phone.
Enjoy the Galaxy S3 styled ROM on your Galaxy Ace S5830i!

Simplicity V3 ROM Final Ace S5830i


 Simplicity V3 ROM Final Ace S5830i + Themes:


IPHONE-THEME-FOR-SIMPLICITY-V3Simplicity-V3-ROM-Final-Ace-S5830iXPERIA-S-THEME-FOR-SIMPLICITY-V3

Review:

Do you own a Samsung Galaxy Ace S5830i and are crazy about iPhone, you can enjoy the look and feel of the iOS on your very Ace S5830i with the Simplicity V3 Final ROM for your phone. The ROM does not only lets you enjoy the iOS look on your Ace, but it also comeS with Xperia Arc and Xperia S themes that completely revamp the look of your Galaxy Ace S5830i.
I would like to recommend this theme for your phone not only for its theming capabilities, but also for its smooth performance and features. The only known bugs of the ROM are Kies and Camera not working. The Camera bug, however, can be fixed by installing the camera app (download below). Copy the Camera.apk to your device’s SD Card and install it from File Manager.

Downloads and Instructions:

Simplicity V3 Final ROM Galaxy Ace S5830i: Link
Google Apps (MDPI): Gapps-mdpi-20110501-signed.zip
Camera App: Link1,  Link2
iPhone Theme: Theme,  iPhone Lockscreen
Xperia Arc Theme: Theme,  Icons
Xperia S Theme: Theme,  MMS FixMusic Player
Adobe Flash Player for Ace S5830i: Link1,  Link2
How to Install:
Install the ROM using the steps given in the tutorial given the beginning of the post.
  1. To install the themes and Adobe Flash Player on your Galaxy Ace S5830i, follow the following steps:
  2. Download the zips (do not extract them)
  3. Boot the phone into CWM Recovery.
  4. Scroll down to “install zip from sd card> choose zip from sd card>”,  select the desired zip and confirm your choice by selecting “yes”.
  5. When the file is installed, go back to the main menu of the CWM and scroll to “advanced’ option and “wipe dalvik cache”.
  6. Return to main menu and select “reboot system now”.
  7. Done! Enjoy the new theme!

How to Install a Custom ROM on Galaxy Ace S5830i:


How to Install a Custom ROM on Galaxy Ace S5830i:

Making Preparations:
Well, if you ready to flash a custom ROM on your Galaxy Ace 5830i, you need to do a few things before proceeding to flash the ROM.  Among the other things you need to do before installing this ROM are:
  • Get your Galaxy Ace 5830i fully charged.
  • Backup all your contacts, messages and other important data.
  • Turn on the USB Debugging mode on your device. Go to Settings> Applications>Development> USB Debugging> check the box.
  • Download the ROM  you like from the links below. Do not extract the zip file and copy it  to the main directory of your device’s SD Card (not in a sub-folder).
  • Download Google Apps for your phone from below (do not extract) and copy it to the same location as the ROM file.
Installing a ROM on Galaxy Ace:
  1. First of all make sure that you have done all things mentioned above under preparations.
  2. Turn off your device and boot it into CWM Recovery Mode. Press and hold  the Volume Up + Home keys and then long ress  the Power key till the start up screen with “Samsung Galaxy Ace GT-S5830i″ logo blinks for two times and you see a screen as shown below.  Another way to boot the device into ClockworkMod  to download the ROM Manager app from the Google Play Store and use “Reboot into Recovery” option.
  3. In the Recovery Mode, use Volume, Home and Power keys to navigate between the options and select them.
  4. Open “backup and restore” and backup your current ROM (important). When the backup is done go back to the main menu
  5. In the CWM Recovery Mode, scroll to “wipe data factory reset” option and select “Yes”.
  6. Go to Advanced option and “wipe dalvik cache”.
  7. Then come back to the main menu and select “install zip from sdcard> choose zip from sdcard”. Now browse to the ROM file and select it. Confirm your choice by selecting “yes”.
  8. This will start the installation process and will take a few minutes to complete.
  9. When it is done, go back and install the GApps using Step 8.
  10. Return to the main menu again and select “reboot system now”. It might take a few minutes before your device reboots, so a little patience is required.
When the phone boots up, you will be able to enjoy the newly installed Jelly Bean ROM on your Galaxy Ace S5830i. Cheers!

Android 4.1.1 Jelly Bean ROM for Samsung Galaxy Ace GT-S5830i


Android 4.1.1 Jelly Bean ROM for Samsung Galaxy Ace GT-S5830i is now available from Android Developers. The Jelly Bean ROM for Galaxy Ace 5830i from is named as Jelly Blast (jellyblast). You can upgrade your phone to Android 4.1.1 Jelly Bean Operating System by installing this custom ROM. After installing the rom you can find your phone has upgraded to Android 4.1 Jelly Bean version in About phone option under settings menu.
The Samsung Galaxy Ace S5830i is normally comes with Android 2.3 Gingerbread as an Operating System. There is no official Android 4.0 Ice Cream Sandwich upgrade from Samsung mobile Support. Because the phone’s hardware configuration is not supported for the upgrade. The Phone is comes with 832 MHz processor, 5 Mega pixel camera, 3.5 inch capacitive touch Screen. Galaxy Ace s5830i is capable to run Jelly Blast custom ROM Android 4.1.1 Jelly Bean on your phone.
samsung galaxy ace s5830i jelly bean blast rom photos

Warning:

  • We are not responsible for any damages that may happened due to using this ROM. If any problem happens that related to installing, we will help you to solve it.
  • Use this guide at your own risk. We shall not have any liability or responsibility for whatever happens to you and your device by using the instructions in this guide.
  • The instructions provided in this tutorial for educational purpose only. There is no guarantee that these steps will work for your device.
  • The steps given in this tutorial is only to use with Samsung Galaxy Ace and the model number S5830i. Applying this guide to any other device or any other model may produce many problems.
  • Read and Understand the whole tutorial first, before going to perform the steps.

Pre Requirements:

  • SMS – How to Backup Messages
  • Contacts – Sync with Gmail App
  • Videos, Images, Songs and Other Files – Copy to internal / External SD card or System
  • APN Settings – Take Manual Note from “Settings > Wireless & Networks > Mobile Networks > Access Point Names
  • Then maintain minimum 60% charge in your phone’s battery. This will help you to don’t get switched of your phone.
  • And disable any antivirus and firewalls too.

How to install Android 4.1.1 Jelly Bean Jelly Blast ROM on Samsung Galaxy Ace S5830i:

  • Download the ROM JELLYBLASTV3.0.3_Ported_For_S5830I.zip – 133.04 MB – Here
  • Transfer the downloaded file to your SD card by USB cable.
  • Switch off your phone and reboot into recovery mode.
  • To open recovery mode, press HOME + POWER + VOLUME UP button together.
  • Then you will move on to custom Recovery.
  • Then select the option, “Install zip from SD card”
  • After that select “Choose zip from SD card”
  • Now choose the downloaded file.
  • And confirm the selection in next page.
  • Wait for the process finish.
  • In few minutes your phone will says completed message in recovery screen.
  • Then select “reboot system now” option to reboot your phone.
  • Note: First boot takes some long time. It will install the updates on first time.